
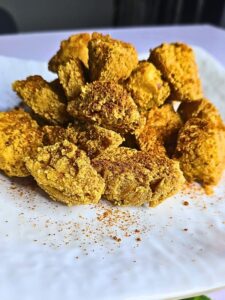
Awara Recipe (Tofu).
Nigerian Awara (Tofu); dried soybeans soaked overnight, peeled, blended into a smooth slurry, strained through muslin cloth and slow boiled into fresh soy milk then curdled with fresh lemon juice and pressed for 1–2 hours into firm tofu blocks that are sliced and fried golden in vegetable oil.
A completely natural, dairy-free, high protein traditional Nigerian snack made from scratch with just 4 cups of soybeans, lemon juice and salt.
Servings 10 people
Calories 203kcal
Cost $2
Equipment
- 1 Cheesecloth / muslin cloth or fine cloth (for straining) Squeeze as thoroughly as possible during both the straining and pressing stages; incomplete squeezing during straining reduces your soy milk yield while incomplete pressing during curdling produces soft watery awara that breaks apart in hot oil during frying.
- 1 Blender / grinder Blend soaked beans in small batches with water in a 1:2 ratio rather than overloading the blender; overloading produces a coarse uneven slurry that yields significantly less soy milk and results in grainy crumbly awara texture.
- 1 Large pot (for boiling soymilk) Use the largest pot available for boiling the soy milk; soy milk foams rapidly and overflows within seconds of reaching boiling point so a large pot with extra headspace is essential for safe and controlled boiling.
- 1 Container or mold for press. Line your mold with cheesecloth before adding the curds and place a firm heavy weight on top; the heavier and more even the weight the firmer and more sliceable your final awara block will be after pressing.
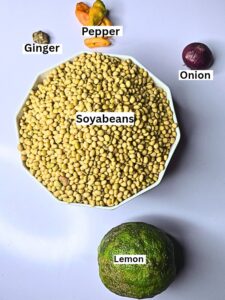
Ingredients
- 4 cups of Soybeans Sort carefully before soaking to remove stones, debris and broken beans; a missed stone damages your blender blade and broken beans reduce the quality and overall yield of your final awara significantly.
- 15 cups clean water Use clean filtered water throughout every stage; sorting, soaking, blending, boiling and pressing; as water quality directly affects the taste, texture and shelf life of homemade awara since there are no preservatives in this recipe.
- 1 whole One lemon juice or lemon water Use freshly squeezed lemon juice rather than bottled lemon concentrate; fresh lemon juice produces cleaner more consistent curds and delivers a lighter fresher flavor to the finished awara than acidic bottled alternatives.
- 1 teaspoon salt Add salt before pressing rather than after frying; salt worked into the curds during pressing seasons the awara from the inside out delivering a more evenly flavored result than surface seasoning alone achieves.
- 4 cups Vegetable oil Use enough oil for proper shallow or deep frying; too little oil causes the awara to stick to the pan and tear apart rather than developing that beautiful golden crispy crust on all sides evenly.
- 1/8 teaspoon seasoning. Use sparingly as a little goes a very long way in awara; too much seasoning overpowers the clean natural soybean flavor that makes Nigerian awara completely unique and different from plain unseasoned tofu.
Instructions
- Step 1: Sorting, Washing, and Soaking the Soybeans: Sorting and Initial Wash. First, pick through your dry soybeans to remove stones, debris, dirt, and broken beans. This helps protect your blender and ensures purity. Then, rinse the beans thoroughly in clean water. Swirl them and change water until it runs mostly clear. soak the beans in plenty of water (at least 3–4 times their volume) for 6 to 12 hours, or overnight. The beans will swell and soften, making them easier to grind and peel.
- Step 2: Dehulling / Peeling the Soybeans (Removing the Coat). After soaking, you’ll notice many beans have loosened coats (skins). Removing these helps improve the smoothness of milk and reduces bitterness. First, rub the beans gently in your hands while in water to loosen skins. Then, pour off the floating skins with water.
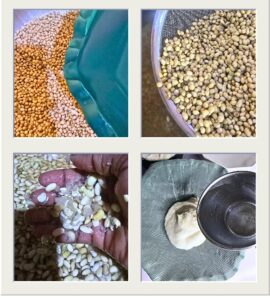
- Step 3: Grinding into Slurry / Paste: Now drain the soaked beans (preserve soaking water if desired) and then grind in a blender with water to form a smooth slurry. Use roughly 1 part beans : 2 parts water (by weight or volume) as a starting point Grind in batches, not too much at once. The result should be a thick paste or slurry
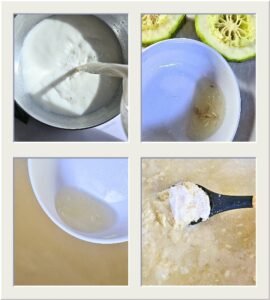
- Step 4: Filtering / Sieving to Get Soymilk (Removing Okara): Once you have a smooth slurry, you want to separate the liquid (soymilk) from the solid pulp (okara). Pour the slurry through a cheesecloth, muslin cloth, or fine sieve into a large pot. Gather cloth edges and squeeze to extract as much milk as possible
- Step 5: Boiling the Soymilk Carefully: This is a critical stage. The soymilk must be brought to near-boil, but you must watch for foaming and avoid burning or overflowing. Place the pot on medium heat. Stir occasionally. As the milk warms, foam may form; reduce heat or stir gently to prevent overflow. When it begins to bubble, reduce heat to avoid boiling over. Add Lemon Water to Coagulate / Curdle. Once coagulation begins: Turn off heat (or reduce to very low). Cover the pot, let it sit undisturbed for 10–20 minutes to allow full separation. Do not stir aggressively; let gravity help the separation. The curds will firm up.

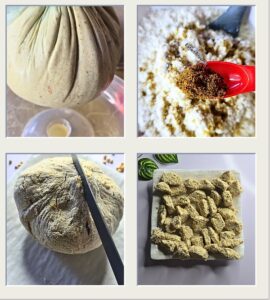
- Step 6: Place a cheesecloth / muslin cloth inside a sieve or colander: Tie or secure the cloth, and place a weight (flat board + heavy object) on top. Let it press for 1 to 2 hours (or more) to remove excess water. Slicing into pieces and fry in vegetable Oil.
Notes
Sort soybeans carefully before soaking to remove stones, debris and broken beans; a missed stone damages your blender blade and broken beans reduce the quality and yield of your final awara. Soak in plenty of water for 6–12 hours or overnight as properly soaked beans blend smoother, peel easier and produce a richer creamier soy milk base for better awara texture.
After soaking rub the beans gently between your palms in water to loosen and remove the outer skins; dehulling significantly reduces bitterness and improves the smoothness and flavor of the final tofu. Rinse several times until most husks float away and the water runs mostly clear before blending. Blend soaked beans with water in a 1:2 ratio in small batches rather than all at once; overloading the blender produces an uneven coarse slurry that yields less milk and results in grainy awara.
Squeeze the muslin cloth as thoroughly as possible during straining to extract every drop of soy milk from the okara pulp.
Watch the soy milk very carefully during boiling; soy milk foams rapidly and overflows within seconds of reaching boiling point. Stir occasionally on medium heat and reduce immediately once bubbling begins. Add lemon juice gradually and evenly around the pot rather than pouring it all in one spot; even distribution produces consistent uniform curds throughout.
Once curdling begins turn off the heat immediately and leave the pot completely undisturbed for 10–20 minutes; stirring or disturbing the pot at this stage breaks up the forming curds and produces a crumbly weak tofu that will not hold together during frying. Press the curds for at least 1–2 hours under a firm weight; under-pressed awara retains too much moisture and breaks apart in the frying oil instead of holding its shape and crisping up properly. Season with salt and a pinch of seasoning before frying for the most flavorful result. Storage tip:
Store unfried awara submerged in clean cold water in an airtight container in the refrigerator for up to 3 days — changing the water daily keeps it fresh and prevents souring.