This is a post on best Awara Recipe (Tofu)
When I was in primary school up in the northern part of Nigeria, awara was one of my most cherished treats and still is just like Quick Crispy Potato Chips and delicious Yamarita.
Every break time, I would hurry out of the classroom and rush to the little roadside stall near the school gate where the wara (awara) seller stood, his tray balanced on his head. He would call out in Hausa, “Wara! Wara! Beske!”, and all the pupils would swarm around him.
I remember how eager I was to buy two or even three pieces alongside the popular Chin-Chin. With the warm, slightly chewy texture dipped into spicy pepper sauce, every bite felt like a reward for surviving the morning lessons and ever since those days, awara has held a nostalgic place in my heart.
As I grew older, I decided I should learn how to make it myself not just for the flavor, but also to preserve that connection to home, memory, and culture. Also check out this quick and easy
Thus, in this post, I’ll take you from bean to plate: how to make awara (tofu) from soybeans, using lemon water as a coagulant, and frying with groundnut oil to golden perfection.
Along the way, I’ll share tips, pitfalls, and personal touches to help your awara be soft, tasty, and crispy. Also read our viral quick and Crunchy Plantain Chips Recipe on our authentic blog.
Why This Nigerian Awara Recipe (Tofu)?
But first, why bother making awara at home when you can buy it on the road? Here are several compelling reasons:
Freshness & Health: When you make it yourself, you control every ingredient—no preservatives, no hidden chemicals.
Cost‑effective: Buying raw soybeans and making tofu yourself is often cheaper in the long run than constant street purchases.
Nutrition: Soybean tofu (awara) is high in protein, contains all essential amino acids, and is rich in calcium, iron, and unsaturated fats.
Dietary flexibility: For vegetarians, vegans, or lactose-intolerant individuals, it’s a great plant‑based protein.
Cultural heritage: Home making keeps alive the traditional skill, connecting us to our roots.
Thus, whether for health, culture, or savings, making your own awara is worthwhile.
Quick Overview of Quick Nigerian Tofu Recipe (Tofu) Process
To make it easy for you, here are simple outline of the steps:
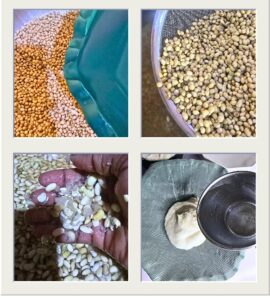
Sort, clean, and soak the soybeans
Dehull / remove coats (peeling)
Grind soaked beans into slurry / paste
Sieve / filter to get soymilk (removing okara)
Boil the soymilk with careful stirring
Add coagulant (lemon water) gradually to curdle
Allow curds and whey to separate
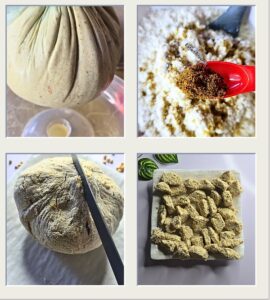
Drain / press the curds (forming tofu block)
Slice into pieces
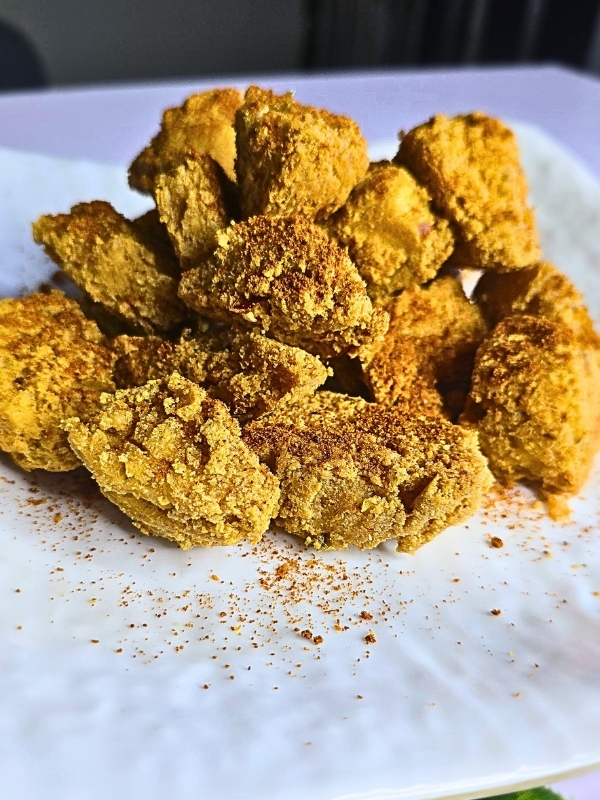
Finally, fry in groundnut oil until golden
Serve with pepper sauce or accompaniments
Each of these steps requires attention, and small adjustments can make the difference between excellent awara and a fail.
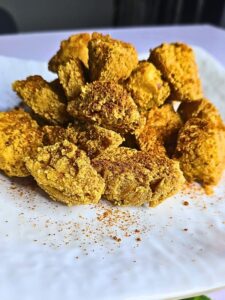
Awara Recipe (Tofu).
Equipment
- 1 Cheesecloth / muslin cloth or fine cloth (for straining) Squeeze as thoroughly as possible during both the straining and pressing stages; incomplete squeezing during straining reduces your soy milk yield while incomplete pressing during curdling produces soft watery awara that breaks apart in hot oil during frying.
- 1 Blender / grinder Blend soaked beans in small batches with water in a 1:2 ratio rather than overloading the blender; overloading produces a coarse uneven slurry that yields significantly less soy milk and results in grainy crumbly awara texture.
- 1 Large pot (for boiling soymilk) Use the largest pot available for boiling the soy milk; soy milk foams rapidly and overflows within seconds of reaching boiling point so a large pot with extra headspace is essential for safe and controlled boiling.
- 1 Container or mold for press. Line your mold with cheesecloth before adding the curds and place a firm heavy weight on top; the heavier and more even the weight the firmer and more sliceable your final awara block will be after pressing.
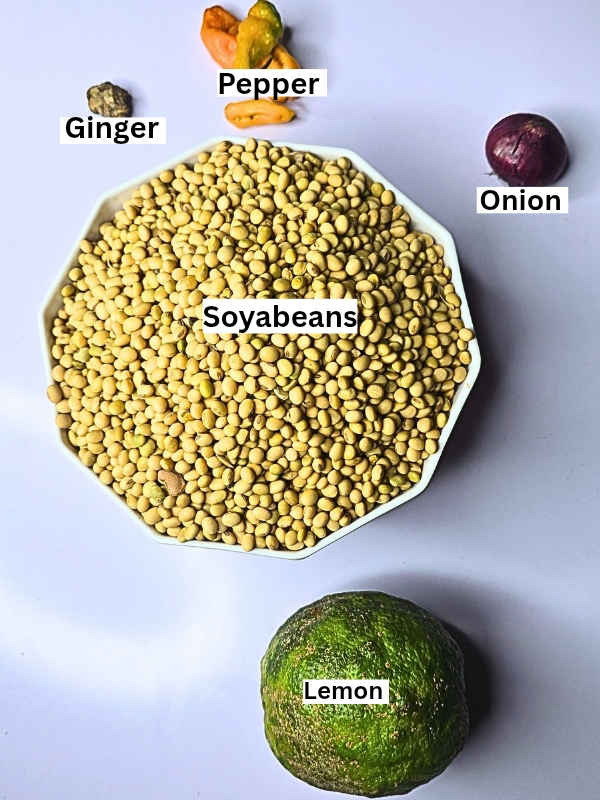
Ingredients
- 4 cups of Soybeans Sort carefully before soaking to remove stones, debris and broken beans; a missed stone damages your blender blade and broken beans reduce the quality and overall yield of your final awara significantly.
- 15 cups clean water Use clean filtered water throughout every stage; sorting, soaking, blending, boiling and pressing; as water quality directly affects the taste, texture and shelf life of homemade awara since there are no preservatives in this recipe.
- 1 whole One lemon juice or lemon water Use freshly squeezed lemon juice rather than bottled lemon concentrate; fresh lemon juice produces cleaner more consistent curds and delivers a lighter fresher flavor to the finished awara than acidic bottled alternatives.
- 1 teaspoon salt Add salt before pressing rather than after frying; salt worked into the curds during pressing seasons the awara from the inside out delivering a more evenly flavored result than surface seasoning alone achieves.
- 4 cups Vegetable oil Use enough oil for proper shallow or deep frying; too little oil causes the awara to stick to the pan and tear apart rather than developing that beautiful golden crispy crust on all sides evenly.
- 1/8 teaspoon seasoning. Use sparingly as a little goes a very long way in awara; too much seasoning overpowers the clean natural soybean flavor that makes Nigerian awara completely unique and different from plain unseasoned tofu.
Instructions
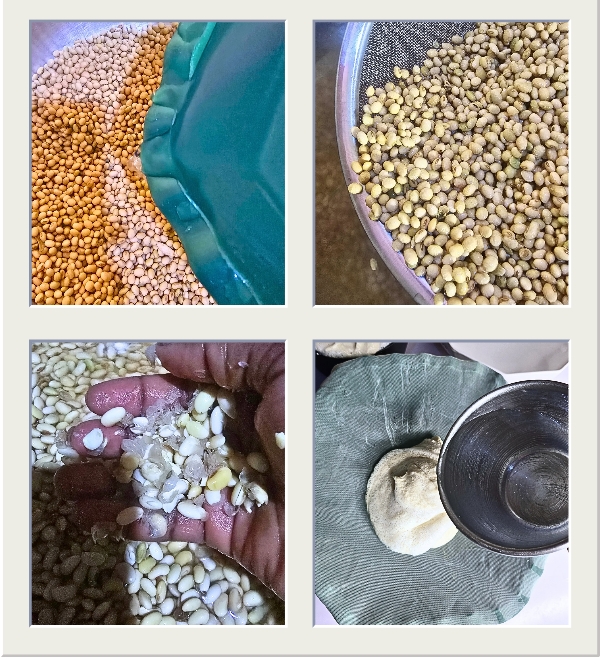
- Step 1: Sorting, Washing, and Soaking the Soybeans: Sorting and Initial Wash. First, pick through your dry soybeans to remove stones, debris, dirt, and broken beans. This helps protect your blender and ensures purity. Then, rinse the beans thoroughly in clean water. Swirl them and change water until it runs mostly clear. soak the beans in plenty of water (at least 3–4 times their volume) for 6 to 12 hours, or overnight. The beans will swell and soften, making them easier to grind and peel.

- Step 2: Dehulling / Peeling the Soybeans (Removing the Coat). After soaking, you’ll notice many beans have loosened coats (skins). Removing these helps improve the smoothness of milk and reduces bitterness. First, rub the beans gently in your hands while in water to loosen skins. Then, pour off the floating skins with water.

- Step 3: Grinding into Slurry / Paste: Now drain the soaked beans (preserve soaking water if desired) and then grind in a blender with water to form a smooth slurry. Use roughly 1 part beans : 2 parts water (by weight or volume) as a starting point Grind in batches, not too much at once. The result should be a thick paste or slurry
- Step 4: Filtering / Sieving to Get Soymilk (Removing Okara): Once you have a smooth slurry, you want to separate the liquid (soymilk) from the solid pulp (okara). Pour the slurry through a cheesecloth, muslin cloth, or fine sieve into a large pot. Gather cloth edges and squeeze to extract as much milk as possible
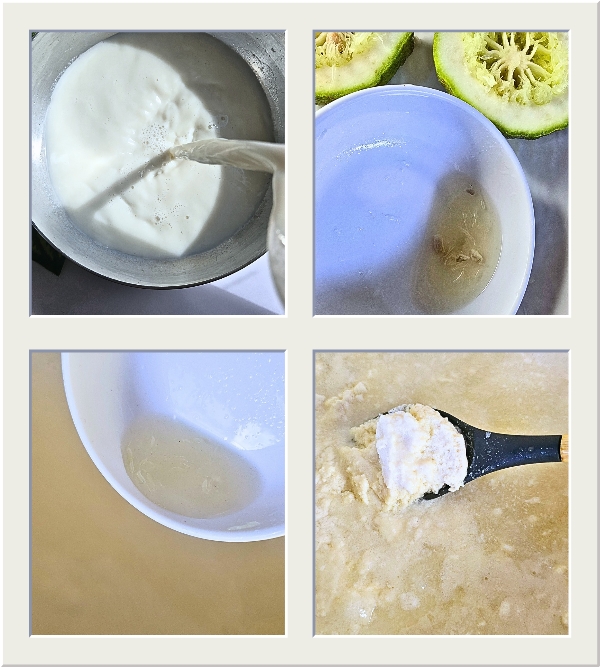
- Step 5: Boiling the Soymilk Carefully: This is a critical stage. The soymilk must be brought to near-boil, but you must watch for foaming and avoid burning or overflowing. Place the pot on medium heat. Stir occasionally. As the milk warms, foam may form; reduce heat or stir gently to prevent overflow. When it begins to bubble, reduce heat to avoid boiling over. Add Lemon Water to Coagulate / Curdle. Once coagulation begins: Turn off heat (or reduce to very low). Cover the pot, let it sit undisturbed for 10–20 minutes to allow full separation. Do not stir aggressively; let gravity help the separation. The curds will firm up.
- Step 6: Place a cheesecloth / muslin cloth inside a sieve or colander: Tie or secure the cloth, and place a weight (flat board + heavy object) on top. Let it press for 1 to 2 hours (or more) to remove excess water. Slicing into pieces and fry in vegetable Oil.


Notes
After soaking rub the beans gently between your palms in water to loosen and remove the outer skins; dehulling significantly reduces bitterness and improves the smoothness and flavor of the final tofu. Rinse several times until most husks float away and the water runs mostly clear before blending.Blend soaked beans with water in a 1:2 ratio in small batches rather than all at once; overloading the blender produces an uneven coarse slurry that yields less milk and results in grainy awara.
Squeeze the muslin cloth as thoroughly as possible during straining to extract every drop of soy milk from the okara pulp.
Watch the soy milk very carefully during boiling; soy milk foams rapidly and overflows within seconds of reaching boiling point. Stir occasionally on medium heat and reduce immediately once bubbling begins. Add lemon juice gradually and evenly around the pot rather than pouring it all in one spot; even distribution produces consistent uniform curds throughout.
Once curdling begins turn off the heat immediately and leave the pot completely undisturbed for 10–20 minutes; stirring or disturbing the pot at this stage breaks up the forming curds and produces a crumbly weak tofu that will not hold together during frying.Press the curds for at least 1–2 hours under a firm weight; under-pressed awara retains too much moisture and breaks apart in the frying oil instead of holding its shape and crisping up properly. Season with salt and a pinch of seasoning before frying for the most flavorful result.Storage tip:
Store unfried awara submerged in clean cold water in an airtight container in the refrigerator for up to 3 days — changing the water daily keeps it fresh and prevents souring.
Ingredients & Equipment Needed for Easy African Awara Recipe (Tofu)
Ingredients
Here is a typical ingredient list (you can scale up or down):
4 cups of Soybeans
Enough clean water (for soaking, grinding, rinsing, boiling)
One lemon juice or lemon water (as coagulant) — freshly squeezed
1 teaspoon of Salt (to taste)
4 cups of vegetable oil (for frying) — or any neutral cooking oil
Optional: a pinch of seasoning (like bouillon/ or spices (pepper, onion)
Note on coagulant: Although in this post we use lemon water, other coagulants such as alum, vinegar, Epsom salt, or fermented millet water (omi ogi) may also be used.
Equipment & Tools for Awara Recipe (Tofu)
You’ll also need:
Large bowl (for soaking)
Colander or sieve
Cheesecloth / muslin cloth or fine cloth (for straining)
Blender / grinder
Large pot (for boiling soymilk)
Stirring spoon / spatula
Container or mold for pressing tofu (wooden board or flat tray with weight)
Knife (for slicing)
Frying pan or deep pot for frying
Slotted spoon or frying strainer
It helps if your cloth is clean and food-grade. Cleanliness is paramount to avoid off‑flavors or contamination.
Step 1: Sorting, Washing, and Soaking the Soybeans for Awara Recipe (Tofu)
Sorting and Initial Wash
First, pick through your dry soybeans to remove stones, debris, dirt, and broken beans. This helps protect your blender and ensures purity.
Then, rinse the beans thoroughly in clean water. Swirl them and change water until it runs mostly clear.
Soaking
Next, soak the beans in plenty of water (at least 3–4 times their volume) for 6 to 12 hours, or overnight. The beans will swell and soften, making them easier to grind and peel.
Tips & transitions:
Meanwhile, cover the bowl with a cloth or lid to prevent dust or insects.
Then, If you live in a warm area, you can change soaking water halfway to reduce fermentation or off-smell.
Finally, soaking helps to activates enzymes, making the beans easier to digest.
By the end of soaking, the beans should be soft, swollen, and partly split. If they are still very hard, they may need more soaking.
Step 2: Dehulling / Peeling the Soybeans (Removing the Coat)
After soaking, you’ll notice many beans have loosened coats (skins). Removing these helps improve the smoothness of milk and reduces bitterness.
First, rub the beans gently in your hands while in water to loosen skins.
Then, pour off the floating skins with water.
Meanwhile, repeat rinsing until most skins are gone.
This peeling step is optional for some home cooks, but it improves texture. In practice, many recipes skip full dehulling but do partial peeling.
Step 3: Grinding into Slurry / Paste for Awara Recipe (Tofu)
Now drain the soaked beans (preserve soaking water if desired) and then grind in a blender with water to form a smooth slurry.
Use roughly 1 part beans : 2 parts water (by weight or volume) as a starting point
Grind in batches, not too much at once
The result should be a thick paste or slurry
You may have to adjust water amount so the paste is smooth but not too watery.
Step 4: Filtering / Sieving to Get Soymilk (Removing Okara)
Once you have a smooth slurry, you want to separate the liquid (soymilk) from the solid pulp (okara).
Pour the slurry through a cheesecloth, muslin cloth, or fine sieve into a large pot
Gather cloth edges and squeeze to extract as much milk as possible
At the end, you should have a pot containing soymilk (the liquid) and a pile of pulp that you can discard or reuse.
Step 5: Boiling the Soy milk Carefully for Awara Recipe (Tofu)
This is a critical stage. The soymilk must be brought to near-boil, but you must watch for foaming and avoid burning or overflowing.
Place the pot on medium heat
Stir occasionally
As the milk warms, foam may form; reduce heat or stir gently to prevent overflow
When it begins to bubble, reduce heat to avoid boiling over
Many recipes emphasize stirring, sliding off heat momentarily, or using a bit of oil to suppress foam.
Once the milk is hot, get ready to add the coagulant.
Step 6: Adding Lemon Water to Coagulate / Curdle
Here we use lemon juice / diluted lemon water as the coagulant. The acid helps the soy proteins coagulate and separate into curds (solids) and whey (liquid).
How to prepare lemon water:
Squeeze fresh lemon(s).
You might dilute with a small amount of water (say 1 part lemon : 1 part water) for easier distribution.
Remove seeds.
How to coagulant:
When the soymilk is hot (but not vigorously boiling), slowly pour the lemon water into the milk, stirring gently.
Add gradually—don’t dump it all at once.
After adding, gently stir and then cover the pot and allow the mixture to rest undisturbed.
What you expect to see: The milk separates into white curds and clear or light yellowish whey. The curds will clump and the liquid becomes more transparent.
If nothing happens (no curds), you may need more lemon or let it cool slightly. If curds are very small or break apart, temperature or acid amount may be off.
You may experiment: some people add lemon water in two stages.
This coagulation step is similar to tofu making or cheese curdling in principle.
Step 7: Letting Curds & Whey Separate & Rest
Once coagulation begins:
Turn off heat (or reduce to very low)
Cover the pot, let it sit undisturbed for 10–20 minutes to allow full separation
You’ll see the curds settle and whey rise
At this stage, do not stir aggressively; let gravity help the separation. The curds will firm up.
Step 8: Draining & Pressing the Curds (Forming the Tofu / Awara Block)

Now you need to drain off the whey and press the curds to create a unified block.
Place a cheesecloth / muslin cloth inside a sieve or colander
Gently ladle the curds + whey onto the cloth
Fold cloth edges over the curds
Tie or secure the cloth, and place a weight (flat board + heavy object) on top
Let it press for 1 to 2 hours (or more) to remove excess water
You want a block that is firm enough to slice, but not bone-dry. The pressing time controls firmness. Some home cooks press for several hours.
Once pressed, unwrap the block. You now have raw awara / tofu.
Step 9: Slicing into Pieces
First, you start by using a clean knife, slice the pressed block into pieces of your desired thickness and shape — e.g. rectangles, squares, or triangles.
Next you soak the slices briefly in salted water (5–10 minutes) to reduce any residual lemon tang (some cooks recommend this) before frying if you so desire.
Finally, pat dry with a paper towel or clean cloth before frying.
Step 10: Frying in Groundnut Oil
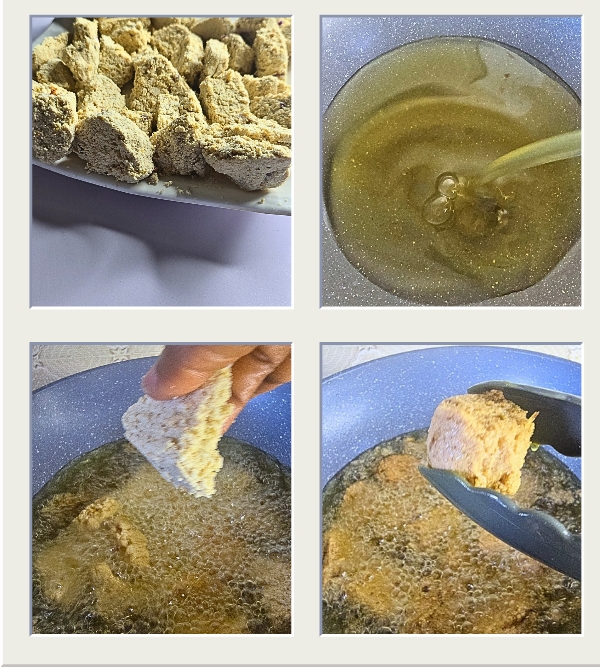
Finally, we fry the awara slices to golden perfection. Use groundnut oil (or any neutral high‑smoke point oil) as requested.
Frying method:
First, heat your oil in a deep pan or pot (enough depth so slices can float)
Next, test oil by dropping a small fragment—if it sizzles immediately, oil is hot
Then, fry slices in small batches, avoid overcrowding
Next, fry until golden brown on both sides, flipping if needed
Finally, use a slotted spoon to remove, drain on paper towels or wire rack
The result: crispy exterior, tender interior, golden color.
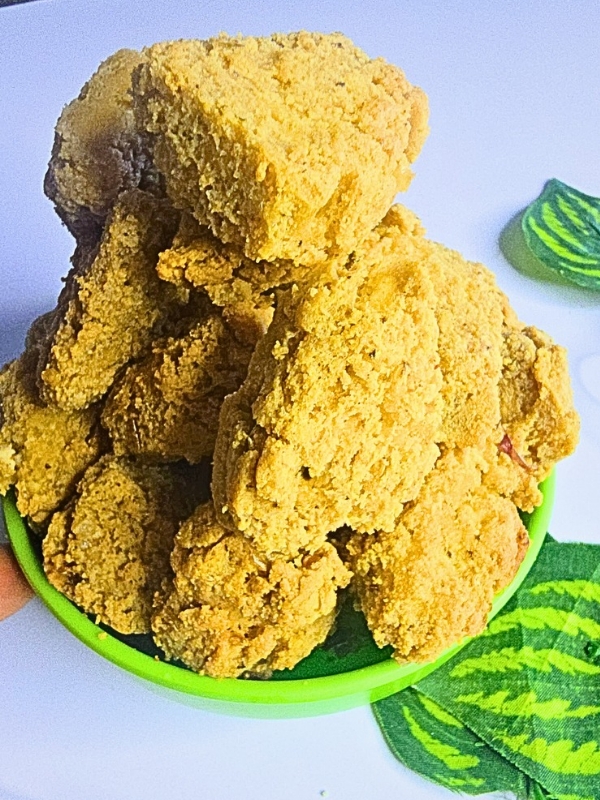
For extra crispness, you may dust slices lightly with flour or starch before frying (optional). Also, you can shallow-fry if you prefer less oil.
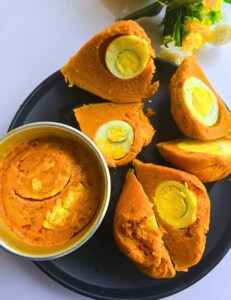
Serving Suggestions of this Awara Recipe (Tofu)
Awara is traditionally enjoyed in many ways:
Serve hot with pepper sauce / hot sauce
Eat with bread, garri, ogi (pap)
Use in stews as protein substitute
Pair with vegetables, salad, yaji (suya spice)
You may garnish with chopped onions, tomatoes, or fresh herbs.
Tips, Tricks & Solution of Awara Recipe (Tofu)
Here are common issues you might face, and how to fix them:
| Issue | Cause | Solution |
|---|---|---|
| No curds (milk doesn’t separate) | Not enough acid, temperature off | Add more lemon gradually, reduce heat, allow more time |
| Curds too small / crumbly | Over-agitation, too much acid, too high heat | Stir gently, reduce acid amount, lower heat |
| Tofu tastes sour | Too much lemon, insufficient rinsing | Soak slices in salted water briefly, reduce lemon in next batch |
| Block too soft / falls apart | Inadequate pressing | Press longer, use more weight |
| Crispy edges burn before inside done | Oil too hot or slices too thick | Lower heat, fry in batches, thinner slices |
Also, maintain clean utensils, fresh water, and sterility to avoid off-flavors or spoilage.
Nutrition & Health Benefits of this Awara Recipe
Awara / tofu from soybeans offers:
High-quality protein (all essential amino acids)
Low in saturated fat, good unsaturated fats
Calcium, iron, magnesium, potassium
Fiber (in residual okara or integrated)
Cholesterol-free (plant-based)
Good for vegetarians, vegans, lactose-intolerant people
However, moderation is key: fried foods should be balanced with fresh vegetables and whole grains.
FAQ on How to Make Awara/Tofu
1. What Are the Ingredients for Awara?
Making authentic Nigerian awara from scratch requires just a few simple and affordable ingredients that are widely available across Nigeria and in African grocery stores internationally.
First you need dried soybeans — the foundation of every awara recipe and the ingredient that determines the quality and yield of your final tofu. Next you need clean water for soaking, blending and boiling the soybeans into fresh soy milk.
Then you need a coagulant; either freshly squeezed lemon juice, alum water or pap water; to curdle the hot soy milk into firm tofu curds.
Additionally you need salt and a small amount of seasoning to flavor the awara before pressing and frying.
Finally you need vegetable oil for frying the pressed awara blocks into that golden crispy finish Nigerian awara is famous for.
Together these simple ingredients produce a completely natural, dairy free, high protein traditional Nigerian snack that costs approximately $2 for 10 full servings.
2. How to Make Awara
Making awara at home is simpler than most people expect and the result is far fresher and more flavorful than anything available in the market.
First sort your dried soybeans carefully to remove stones and broken beans then rinse and soak overnight for 8–12 hours. Next rub the soaked beans between your palms to remove the outer skins and rinse until the water runs mostly clear.
Then blend the peeled beans with clean water in a 1:2 ratio into a smooth slurry and strain through a muslin cloth squeezing thoroughly to extract all the soy milk.
Afterward pour the strained soy milk into a large pot and cook on medium heat stirring occasionally; watch carefully as soy milk foams and overflows very quickly.
Once the milk begins to bubble reduce the heat and gradually add your freshly squeezed lemon juice around the pot evenly. Then turn off the heat, cover the pot and leave completely undisturbed for 10–20 minutes to allow the curds to fully form and separate.
Finally ladle the curds into a muslin cloth lined mold, fold the cloth over the top and press firmly under a heavy weight for 1–2 hours. Once pressed slice into pieces, season and fry in hot vegetable oil until deeply golden and crispy on all sides.
3. How to Make Arwara With Alum in Nigeria Step by Step
Alum is one of the most traditional coagulants used to make awara across Northern Nigeria and it produces a firmer denser curd than lemon juice. Here is the exact step by step process:
Step 1: Prepare the soybeans
First sort, wash and soak your dried soybeans in plenty of clean water overnight for 8–12 hours. Afterward rub off the outer skins and rinse thoroughly until the water runs clear.
Step 2: Blend and strain
Next blend the peeled soybeans with clean water in a 1:2 ratio into a smooth slurry. Then strain through a muslin cloth squeezing thoroughly to extract all the soy milk into a large pot.
Step 3: Prepare the alum solution
Meanwhile dissolve a small piece of food grade alum — roughly the size of a marble; in half a cup of clean warm water and stir until fully dissolved.
Use food grade alum only and never exceed this quantity as too much alum produces a bitter metallic taste in the finished awara.
Step 4: Boil the soy milk
Place the pot of soy milk on medium heat and stir occasionally. Watch carefully as soy milk foams rapidly — reduce heat immediately once bubbling begins to prevent overflow.
Step 5: Add the alum solution
Once the soy milk is hot and just beginning to bubble reduce the heat to very low. Then gradually pour the dissolved alum solution around the pot in a slow steady stream stirring gently once as you pour. Afterward turn off the heat completely, cover the pot and leave undisturbed for 15–20 minutes to allow the curds to fully form and firm up.
Step 6: Press and fry
Finally ladle the curds into a muslin cloth lined mold and press firmly under a heavy weight for 1–2 hours. Once pressed slice into pieces, season with salt and seasoning and fry in hot vegetable oil until golden and crispy on all sides.
Serve hot as a snack or alongside pepper sauce for a complete Nigerian street food experience.
4. What Is the English Name for Awara?
The English name for awara is tofu; specifically fresh homemade soybean curd.
Furthermore awara is the Hausa name used predominantly across Northern Nigeria and neighbouring West African countries while the same product is called wara in Yoruba and simply soybean curd or soya cheese in standard English.
Additionally awara is essentially the West African equivalent of the Asian tofu that has become globally popular in health food and plant based cooking communities worldwide.
However Nigerian awara differs from commercial Asian tofu in one important way; it is traditionally seasoned with salt and local spices before frying which gives it a bold savory flavor that plain unseasoned tofu completely lacks.
Therefore when international readers search for Nigerian tofu recipe or homemade tofu from soybeans they are essentially searching for the same beloved snack that Nigerians have been making and enjoying for generations as awara.
5. Simple Awara Recipe
This simple awara recipe uses just 4 cups of dried soybeans, fresh lemon juice, salt, seasoning and vegetable oil; nothing complicated and nothing artificial.
First soak your soybeans overnight, peel off the skins and blend with clean water into a smooth slurry. Next strain through a muslin cloth squeezing thoroughly to extract fresh soy milk.
Then cook the soy milk on medium heat watching carefully for foaming. Once hot add freshly squeezed lemon juice gradually around the pot, turn off the heat and cover for 15–20 minutes undisturbed.
Afterward ladle the curds into a cloth lined mold and press under a heavy weight for 1–2 hours. Finally slice the pressed awara into pieces, season with salt and a pinch of seasoning and fry in hot vegetable oil until golden and crispy.
That is the complete simple awara recipe; natural, affordable, dairy free and ready to eat in under 3 hours from start to finish.
6. How to Make Awara With Pap Water
Pap water; the fermented liquid that separates from soaked ground corn during pap preparation — is one of the oldest and most traditional coagulants used to make awara across Nigerian communities.
Furthermore using pap water produces awara with a slightly softer texture and a subtle fermented sourness that many Nigerians prefer over lemon juice or alum versions.
First prepare your soy milk following the standard process; sort, soak, peel, blend, strain and bring to near boil on medium heat. Meanwhile collect the clear sour liquid that separates from your pap; this is the pap water coagulant you need.
Once the soy milk is hot and just beginning to bubble reduce the heat to very low.
Then gradually pour the pap water around the pot in a slow steady stream; use approximately 1 cup of pap water per 8 cups of soy milk as a starting guide.
Stir gently once then turn off the heat completely, cover the pot and leave undisturbed for 15–20 minutes.
Afterward ladle the curds into a muslin cloth lined mold, press firmly under a heavy weight for 1–2 hours then slice, season and fry in hot vegetable oil until golden and crispy on all sides.
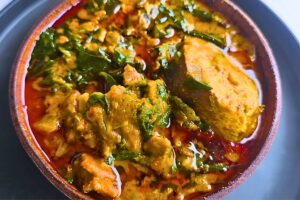
7. Awara With Sauce
Awara with sauce is one of the most popular ways to serve this beloved Nigerian snack and it elevates simple fried tofu into a completely satisfying meal.
First fry your pressed awara slices in hot vegetable oil until deeply golden and crispy on all sides then drain on paper towels and set aside. Next prepare a simple Nigerian pepper sauce by blending scotch bonnet peppers, tomatoes and onions into a smooth paste.
Then heat a small amount of vegetable oil in a pan, add sliced onions and fry until golden. Afterward pour in the blended pepper mix and fry on medium heat for 10–15 minutes stirring occasionally until the raw taste disappears and the sauce thickens beautifully.
Then add salt, seasoning cubes and a pinch of crayfish for extra depth and stir well. Finally add the fried awara pieces directly into the sauce and toss gently to coat every piece evenly.
Allow everything to simmer together for 3–5 minutes so the awara absorbs the bold flavors of the sauce. Serve hot as a snack, side dish or light meal alongside pap, ogi or boiled yam for a complete authentic Nigerian food experience.
Conclusion on African Recipe on Awara
Whether you are making awara with lemon juice, alum or pap water the result is always the same; a deeply satisfying, protein-rich, dairy free Nigerian snack that is as nourishing as it is delicious.
Furthermore awara is proof that the best food does not require expensive ingredients or complicated techniques.
Just four cups of soybeans, clean water and a simple coagulant are all you need to create a traditional Nigerian tofu that is fresher, more flavorful and more affordable than anything you will find in any store.
Therefore whether you are a Nigerian in the diaspora recreating a beloved childhood snack or an international food lover discovering West
African cuisine for the very first time this simple awara recipe delivers authentic flavor, rich nutrition and a genuine connection to Nigerian food culture in every single bite.
Try it today and discover why awara has remained a beloved staple across Nigerian kitchens for generations.
You May Also Like:
Thanks for explaining in detail.